This is a tutorial for people who definitely want to use Hybrid Basic, but don’t know how to start, and what you can do with it.
What is Hybrid Basic? #
Hybrid Basic is an addition to normal Basic, the standard programming language on (TI) calculators. Better said, with Hybrid Basic, you can use the standard Basic, and even some new features. Hybrid Basic is designed for very fast graphics, so if you want a nice game, with some graphics, we encourage you to use Hybrid Basic!
Getting Ready to Program #
Make sure you have DoorsCSE installed on your calculator. You also will want to install TokenIDE on your computer. Doors CSE adds the xLIBC library, as well as many helpful features for your calculator. TokenIDE features an image editor and building tools for the xLIBC library.
Windows #
Unpack the downloaded zip and double click TokenIDE.exe in the folder. DO NOT remove TokenIDE from the folder, as it will not work when removed from its dependencies. You can create a shortcut to the destop if navigating to a folder annoys you.
Linux #
Using TokenIDE on linux is a little roundabout, but it can be done. You just have to install Mono (A wine-like program that includes .net) and then cd to the directory of the program and run TokenIDE
Install Mono #
sudo apt-get install mono-complete
Run TokenIDE #
mono TokenIDE.exe
If you get an error like shown below, go into the TokenIDE.ini and change all of the forward-slashes to back-slashes
Unable to load default file, Tokens/DCSE.xml quitting
Commands #
real(0 - xLIBCSetup #
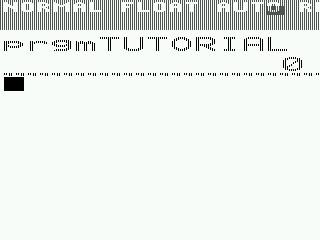
The basic of the the xLIBC functions is the half-resolution. This works as follows: the screen as you normally see will being splitted in two halves. One half would be stretched, the other half you don’t see, that would being our buffer. That would look like this:
As you can see, there is no second half.
Very important! All the xLIBC functions expected to be in half-res mode!
These are the functions of real(0 :
GetXLIBCVersion
real(0,0) -> returns the version of xLIBC in Ans, for me it returns 2.
SetupGraphics
real(0,1,1) -> this enables the half-res mode, as you can see in the previous image.
real(0,1,0,0) -> this returns to the normal mode, WITHOUT redrawing the status bar! This might being useful for some games, which are not in the half-res mode, but do not want to see the status bar.
real(0,1,0,1) -> this returns to the normal mode, and redraws the statusbar.
Very important! Don’t forget to switch the half-res mode off, or the TIOS will stuck in this mode!
SetSpeed
real(0,2,0) -> Disable fast (15MHz) mode, switching to 6MHz mode
real(0,2,1) -> Enable fast (15MHz) mode
Note: the default CPU speed is 15MHz. Try it, and see the difference.
SetupColorMode
real(0,3,0) -> enables all the possible colors in xLIBC
real(0,3,1) -> enables 8COLOUR - I have no idea what changes with this.
real(0,3,2) -> inverts the screen, like black->white and white->black. It gets each color value per pixel, and then 255-(color_value) would be the new color value. To restore it back, invert it again, or ->
real(0,3,3) -> restores the colors back to normal, useful for moments if you do not know whether the colors are inverted or not.
real(0,3,4,(color_value),(update_LCD)) -> fills the active half of the screen with one color from the color palette, useful for backgroud. I will explain the update_LCD later.
real(0,3,5,(color_value)) -> I cannot get this working, but the wiki says that it will change the color value per pixel with shapes and sprites

real(1 - UserVariables #
xLIBC has the facility to utilize ‘internal user variables’ for data storage and calculations as opposed to using TI-OS variables. They work exactly the same, but the main difference is, is that they are faster, and temporary, which means that you cannot ‘save’ them for other programs. Some xLIBC functions expected (only) UserVars, so it is always handy to learn and use these.
These are the functions of real(1:
GetUservar
real(1,0,(uservar_num))
This returns the value of the UserVar in Ans
SetUservar
real(1,1,(uservar_num),(value))
This function writes (value) to UserVar
AddToUservar
real(1,2,(uservar_num),(value))
This function add (value) to UserVar
SubFromUservar
real(1,3,(uservar_num),(value))
This function subtracts (value) to UserVar
Example
real(1,1,1,5 // Sets uservar 1 to 5
Disp real(1,0,1 // Displays Uservar 1
real(1,2,1,3 // Adds 3 to uservar 1
Disp real(1,0,1
real(1,3,1,7 // Subtracts 7 from uservar 1
Disp real(1,0,1
Pause //Pauses program
Try the above code out on your calculator!
real(2 - GetKey #
These routines have been significantly overhauled from the TI-BASIC getKey function and are even more comprehensive.
These are the functions of real(2:
GetKey
real(2,0,0)
Key code stored in Ans Very important! These values are NOT the same as the values of getKey, but it returns the values of _GetCSC:
GetKeyCheckList
real(2,0,1,(getkey_checknum),(getkey_keyvalue),(getKey_uservar),(getkey_value),... )
This updates (getkey_uservar) by (getkey_value) if you pressed (getkey_keyvalue). (getkey_checknum) is the amount of UserVars to update. Useful for counters or sprites.
GetKeyArrows
real(2,1,(uservar_x),(uservar_y),(value_x),(value_y))
This updates (uservar_x) and (uservar_y) with respective (value_x) and (value_y) if you pressed any arrow.
- If up is pressed then USERVAR_Y = USERVAR_Y - VALUE_Y
- If down is pressed then USERVAR_Y = USERVAR_Y + VALUE_Y
- If left is pressed then USERVAR_X = USERVAR_X - VALUE_X
- If right is pressed then USERVAR_X = USERVAR_X + VALUE_X
GetKeyArrowsDiagonals
real(2,2,(uservar_x),(uservar_y),(value_x),(value_y))
This works the same as GetKeyArrows, with the exception that a combination of the arrows also will update the UserVars.
- If up is pressed then USERVAR_Y = USERVAR_Y - VALUE_Y
- If down is pressed then USERVAR_Y = USERVAR_Y + VALUE_Y
- If left is pressed then USERVAR_X = USERVAR_X - VALUE_X
- If right is pressed then USERVAR_X = USERVAR_X + VALUE_X
- If up+left is pressed then USERVAR_Y = USERVAR_Y - VALUE_Y, USERVAR_X = USERVAR_X - VALUE_X
- If up+right is pressed then USERVAR_Y = USERVAR_Y - VALUE_Y, USERVAR_X = USERVAR_X + VALUE_X
- If down+left is pressed then USERVAR_Y = USERVAR_Y + VALUE_Y, USERVAR_X = USERVAR_X - VALUE_X
- If down+right is pressed then USERVAR_Y = USERVAR_Y + VALUE_Y, USERVAR_X = USERVAR_X + VALUE_X
GetKeyArrowsCheckTile
real(2,3,(uservar_x),(uservar_y),(value_x),(value_y),(uservar_mapwidth),(collisiontile),(mapstring),(x_left),(y_up),(x_right),(y_bottom))
This routine will only update the UserVars with their values if the move is to a walkable tile (see real(3) - DrawMap). You must specify an UserVar with the width of the map (that is often 20, 160/Cool. It checks for a box from (X_left, Y_top) to (X_right, Y_bottom). For a single sprite of 8x8 pixels, that would be (X_sprite+0, Y_sprite+0, X_sprite+7, Y_sprite+7).
GetKeyArrowsDiagonalsCheckTile
real(2,4,(uservar_x),(uservar_y),(value_x),(value_y),(uservar_mapwidth),(collisiontile),(mapstring),(x_left),(y_up),(x_right),(y_bottom)) -> same as above, now with diagonals.
GetKeyArrowsCheckTileList
real(2,5,(uservar_x),(uservar_y),(value_x),(value_y),(uservar_mapwidth),(collisiontile),(mapstring),(x_left),(y_up),(x_right),(y_bottom))
It works the same as real(2,3….), but now it will return information regarding any keypress and any collided tiles in a ‘real list’ contained in a user-defined list named “XL”. XL have the following format: {key_press , num_collided_tiles , collided_tiles_list} key_press returns ~1 for noarrow, 0 for up, 1 for down, 2 for left and 3 for right. num_collided_tiles is the number of tiles collided against collided_tiles_list is a list of collided tiles against.
GetKeyArrowsDiagonalsCheckTileList
real(2,6,(uservar_x),(uservar_y),(value_x),(value_y),(uservar_mapwidth),(collisiontile),(mapstring),(x_left),(y_up),(x_right),(y_bottom))
Same as above, now with diagonals.
All of these routines are pretty useful, for smarter and better movement.
real(3 - DrawMap #
Explanation
real(4 - DrawSprite #
Explanation
real(5 - ManagePic #
Explanation
real(6 - DrawString #
There are three functions for the text command. They let you display text, display TI OS variables (like A or H), or display xLIBC User Variables. The command uses a custom xLIBC 8x8 font, custom colors using the xLIBC palette for the foreground, and a transparent background.
DrawString
This function draws a string stored in Ans, to custom X and Y coordinates, and in a certain color
real(6,0,(value_x),(value_y),(color),(newline_char),(update_lcd))
New Line Chars
This command also has a feature where you can designate where you want to program to drop down a line, essentially pressing a virtual Return button. To do so, choose a character not used in your text, then place that character wherever you want there to be a line break. To designate such character, refer to an ASCII character chart (I use tifreak’s LIBHELP program) and insert the desired number code in the correct function spot.
To draw string “Hello World” in yellow (color 229) at coordinates 0,0 with newline character % (code 37) and to not update the lcd:
"Hello World
real(6,0,0,0,229,37,0
DrawStringValueA
This functions draws a real value, instead of a string. You can display any value at specific coördinates, as long as the value is not lower than ~9999 and not bigger than 9999.I find this useful for tracing the value of a variable while the program is running.
real(6,1,(value_x),(value_y),(color),(value),(update_lcd))
Let’s say I want to know the value of variable J while being in half-res mode, I will do this to display it in white:
real(6,0,0,0,229,J,0)
DrawStringValueB
This works almost the same as DrawStringValueA, but now it displays the value of a UserVar, instead of a real value/variable.
real(6,1,(value_x),(value_y),(color),(uservar_num),(update_lcd))
This is basically the same as real(6,0,(value_x),(value_y),(color),real(1,0,(uservar_num)),(update_lcd)) but this routine is faster.
real(7 - DrawShape #
Explanation
real(8 - xLIBCUtility #
Explanation
real(9 - UpdateLCD #
Explanation
How to make a spritesheet #
There is only one way to make a spritesheet, unfortunately. You must download and install TokensIDE (instructions found above) and open it. Following these steps, you will start a new spritesheet.
# After opening TokensIDE, go to the top menu bar and click Tools > Hex Sprite Editor (1st one down) > Color Sprites (2nd one down), or press Ctrl + Shift + H.
- You can edit the size and palette manually to turn this into an xLIBC spritesheet (128*64 size, xLIBC palette), but for now we’ll use the built-in preset. In the top menu bar, click on Edit > Load Template (4th one down) > xLIBC Tiles (4th one down).
- Click OK in the pop-up, and clear out the blue-and-black mess created. You now have a blank spritesheet to be edited.\
- Draw whatever sprites you want. Sprite slots are always 8*8 pixels, so to see your 8*8 pixel grid, click the checkbox next to Draw Grid near the Width/Height items.
- To save your spritesheet, I save in two ways: PNG and .8xv. To save
as a PNG:
- Go to File > Save As, or press Ctrl + Alt + S.
- Make sure .png is selected in the drop down menu. Name your file and press Save.
- To save as an xLIBC spritesheet AppVar (in .8xv format):
- Go to File > Save As, or press Ctrl + Alt + S.
- Make sure xLIB Tiles (.8xv) is selected in the drop down menu, where it is the 2nd one down, name your file, and press Save.
How to make a tilemap #
We are going to use TokensIDE to make this tilemap using our custom sprites we created above. We’re going to assume that you already have custom tiles ready to edit. You can technically create your own tilemap by writing them as hexadecimal strings, each two bytes representing a specific tile. We’re going to assume you don’t want to do this (as it is pretty difficult, and doesn’t give you visual feedback like the Tokens Map Editor), and assume that you want to create a full screen-sized tilemap. To create a tilemap:
#Load up TokensIDE. Open the map editor by navigating to Tools in the top menu bar, then to xLIBC Map Editor, or by pressing Ctrl + M.
-
Protip: You can easily edit and paste back into your program a pre-created tilemap by highlighting the full string and pressing Ctrl + M, then entering the width value.
-
Once you have opened the map editor, you can add your spritesheet by going to File in the top menu bar, then Add Tiles, or by pressing Ctrl + O. Navigate to and open your spritesheet .8xv file.
-
Now that you’ve opened, you can select, paint, and do special operations like Fill, Line, Square, etc. using your custom tiles, selecting them from the display. The default position for the display is on the left-hand side of the editor window.
-
Once you want to save your tilemap, you can do so in two ways. One is inserting it into your program or AppVar. To do that:
- Make sure you have the file you want to paste into open, and the cursor where you want the data to go.
- Click File > Insert and Exit, or press Ctrl + I. Alternatively, you can copy the hexadecimal string by clicking File > Copy Hex, or pressing Ctrl + C. Ctrl + I will close the window and insert a hexadecimal string to be used in your program. Otherwise, you can paste it in yourself.
-
To save your tilemap as a .png:
- Click File > Export Image (there is no shortcut for this), and
name your file, then click Save.
- To load back your .png, simple click File > Import Image, and either before or after this load in a spritesheet. Tokens will automatically detect and place tiles that perfectly match your spritesheet, and replace unknown ones with a blank tile. Even if you modify one pixel, Tokens will not recognize the tile.
- Click File > Export Image (there is no shortcut for this), and
name your file, then click Save.
-
To use these tilemaps in your program, simply load them with the following code. In here, we will use Str7 to hold map data, but in reality any string can be used. Str0 and Str9 are typically off-limits due to the fact that other DCSE commmands will destroy these variables.
:"tilemap hex data->Str7
:real(3,0,0,0,20,7,0,0,19,14,1
:"Draws a tilemap starting at 0,0 in tilemap data, with a width of 20, in string 7, starting draw at (0,0), ending at (19,14), updating LCD. Note that if you want to fill both sides of GRAM, you will have to call this again. If you are only using one side, this will be good enough.
Example program #
In this section, we want to make a program together with you.
:CODE GOES
:ONE SPACE IN FROM THE MARGIN
:SO MEDIAWIKI CAN PUT IT IN A BOX
You can also add emphasis and use other tools to mark up text.
This Tutorial is in Development #
Go the development thread for information and current progress.