This category contains all of the pages that contain information relevant to the GUI API within Doors CS 6 and higher. Using the GUI routines, you can push and pop items on and off of the GUI stack, render the items on the stack, and use the interactive mouse routines.
Understanding the Stack #
The Doors CS GUI API uses an innovative stack-based system to handle the creation, rendering, and use of GUI-enabled programs. This system has a twofold advantage. Firstly, the sequential order makes it easy to “push” new windows or elements to the top above existing GUI elements, then “pop” them off to return to a backgrounded window. Secondly, by identifying each chunk of data on the stack with a size word and type byte, the stack can easily be traversed backwards and forwards for parsing and properly handle dynamic sizing of array elements.
In utilizing the stack, you will be addressing elements by index from the bottom of the stack, not by absolute or relative memory location, thus avoiding nearly all the problems of dynamic memory allocation. Without further ado, let’s go through the steps of creating, rendering, and handling a GUI element.
Initializing the GUI #
Before you can do anything with the GUI, you must initialize it by calling OpenGUIStack. This will create an Appvar called gui6 (if it doesn’t already exist) and initialize its contents to an empty stack. If in doubt whether the GUI Stack is open yet, call this function anyway; it will silently handle a stack already open and report this state in register c. Once the stack is open, you can begin to push elements onto it.
Adding GUI Elements #
The function for adding elements to the top of the stack is PushGUIStack, defined in dcs6.inc. It takes three arguments, a pointer to the data to be added in hl, the size of the data to add in de, and the type in the accumulator, a. All of the different types are defined in dcs6.inc and can also be referred to numerically as outlined in the documentation for each GUI type. The data pointed to by hl should only contain the data to be added, not the three-byte header that Doors CS adds to the GUI Stack before the data. For example, suppose you wanted to add a small window to the current GUI:
ld hl,SmWinData
ld de,SmWinDataEnd-SmWinData
ld a,GUIRSmallWin
call PushGUIStack
...
SmWinData:
     .db 5,5     ;the x and y coordinates relative to the LCD of the top-left of the window
     .db $F8,$88,$88,$88,$F8   ;a square icon
     .db "My Window",0    ;the window title
SmWinDataEnd:
Once all of the elements you would like to be rendered are on the GUI Stack, you must choose how to deal with them.
Space-Efficiency: Adding Multiple Elements at Once #
If you want to add multiple elements to the GUI at once without repeatedly calling the PushGUIStack function, an alternative function called PushGUIStacks exists (note the pluralization). This takes only one argument, a pointer in hl to a specially-formatted mass of GUI data. The data must contain one or more GUI elements, each specified as a 2-byte size word, a one-byte type byte, and then the one-or-more byte GUI element. The size word should be three bytes larger than if it was the value of de being passed to PushGUIStack; in other words, it represents the size of this item including the type byte and the size word itself. Additional elements in the sequence to be pushed follow the same format. After the last item, to signal that the end of the sequence has been reached, two bytes of $ff (.db $ff,$ff) should be used. The following two-item sequence example is taken from within Doors CS itself:
SimpleGUIMouseData:
   .dw 4
   .db 0
   .db $fe
SimpleGUIMouseDataHS:
   .dw 6+3
   .db $0e
   .db 0,0,96,64
   .dw dbfSimpleGUIMouseClick
SimpleGUIMouseDataEnd:
   .db $ff,$ff
Rendering the GUI #
You can choose two different methods of handling the GUI: rendering the current Stack and then handling input yourself, or handing full control over to Doors CS. If you choose the latter, Doors CS will render the Stack, initiate the mouse subsystem, then wait for the user to click on an actionable item. The function to merely render the GUI is RenderGUI, and the function to hand over full control is GUIMouse. Keep in mind that GUIMouse has a few important restrictions on its usage to maintain the stability of the users’ calculators:
-
Always, always have a ld hl,0 immediately before call GUIMouse unless you specifically are adding a mouse hook.
-
At functions jumped to as a result of clicking in GUIMouse, it is vital to have a call ResetAppPage as the first instruction after the label so that Doors CS is reset to the proper page.
-
Always use the following format to call GUIMouse. Do not jump to it, ever. This will fatally disturb the normal stack:
ld hl,0
call GUIMouse
ret
Accessing Modified Data #
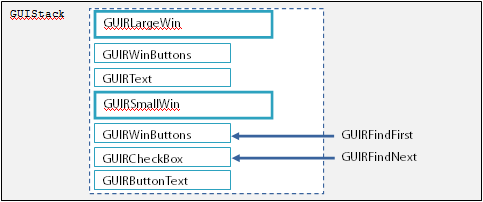
After calling GUIMouse, items in the GUI Stack may have been modified, including the states of radio buttons and checkboxes and the contents of text and numerical entry fields. In order to figure out what the current data of an element in the GUI Stack is, you can use GUIFindFirst and GUIFindNext. You must always start by calling GUIFindFirst; this will return the address and size of the First non-groupmaster element of the top most group on the stack. A groupmaster element is a GUIRnull, a GUIRSmallWin, or a GUIRLargeWin. You can then use GUIFindNext to find subsequent entries in the GUI Stack. Be aware that while GUIFindFirst skips groupmaster elements, GUIFindNext sequentially finds all following entries, including groupmasters.
As of Doors CS 6.6 beta or thereabouts, a third function is available called GUIFindThis, which works very very quickly compared with a series of GUIFindFirst/GUIFindThis/GUIFindThis calls, particularly if the user has a lot of programs.
The following diagram should clarify how accessing the data works. The scenario pictured involves a GUIRLargeWin pushed with several items, then a GUIRSmallWin pushed on top of it with several items of its own. The programmer calls GUIFindFirst, then GUIFindThis so that he or she can check if the checkbox is checked or not.
Removing GUI Elements #
After finishing with parts of the GUI, you can remove items individually or in bulk. For a single GUI entry, use PopGUIStack. If you want to remove multiple elements at once, load the number of elements to be removed into register b and call PopGUIStacks. Doors CS will handle all updating of pointers, memory, and size. However, keep in mind that pointers to variables created after the GUI Stack was opened may need to be updated to take the new size of the gui6 Appvar into account.
Closing the Stack #
When you are done using the GUI, you can remove all GUI elements and close down the API system with the call CloseGUIStack. It is not necessary to pop elements off of the stack before closing it; the CloseGUIStack call will take care of that.
Example of a GUI Program #
Using the GUI system is mainly a matter of pushing a bunch of elements onto the stack, then doing things based on what is done. For example, the following code (should, it’s untested) spawns a GUIRSmallWin at the center of the screen with a ‘Crash’ button which (surprise, surprise) crashes the calculator, as well as a close button in the form of GUIRWinButtons.
  call OpenGUIStack
  ld hl,myWin
  ld de,crashButton-myWin
  ld a,GUIRSmallWin
  call PushGUIStack
  ;this spawns our small window, which holds all other objects
  ;we spawn, until we spawn another groupmaster element
  ld hl,crashButton
  ld de,winButtons-crashButton
  ld a,GUIRButtonText
  call PushGUIStack
  ;just spawned the 'Crash button'
  ld hl,winButtons
  ld de,dat_end-winButtons
  ld a,GUIRWinButtons
  call pushGUIStack
  ;added the close button to the window's title bar
  ld hl,0 ;very important
  call GUIMouse ;handles everything, woo
  ret           ;exit the program
exitMyProg:
  call ResetAppPage
  ret
;it jumps here upon clicking the exit button, and this returns us back
;to where the call to GUIMouse is
myWin:
 .db 15             ;x coordinate of the window, 15 makes it centered
 .db 15             ;same, but y coordinate
 .db 0,0,0,0,0      ;just a blank icon, since I'm lazy
 .db "Crash me!",0  ;the window title
crashButton:
 .db 1              ;x coordinate- this is the coordinate WITHIN THE
                    ;CURRENT GROUPMASTER, not overall
 .db 1              ;y coordinate- see above
 .dw 0              ;I'm just having it jump to 00h when you click this,
                    ;it's just the easiest way to crash it
 .db "Crash!",0     ;the text to display on the button
winButtons:
 .db 00100000b      ;only displaying a close button
 .dw 0              ;null pointer
 .dw 0              ;another null pointer
 .dw exitMyProg     ;we'll jump to exitMyProg when this button is clicked
dat_end: